The Nginx web server
Nginx is a light but heavy-on-features web server developed by Igor Sysoev in 2002 that has adopted a different approach regarding threading and asynchronous handling of connections offering a better overall performance than other web servers.
HTTP basic access authentication – The basic
Basic access authentication is the most straightforward access control technique for web resources. It relies solely on its standard HTTP headers and does not require cookies, session tracking, or login portals.
At the same time, HTTP basic authentication is highly insecure as it is prone to brute force and other sophisticated attack techniques. Please read the “Security considerations” section at RFC-editor.
It is advised to use it on your private cloud and only on nginx virtual hosts running on SSL/TLS.
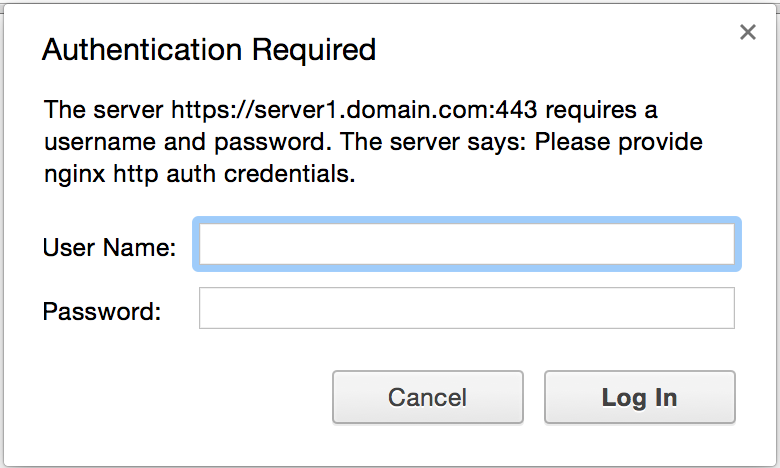
A web server enforcing basic HTTP auth will return an “HTTP/1.1 401 Unauthorized” HTTP code followed by WWW-Authenticate: Basic realm= “your message “HTTP header.
Instead, the client will return the same HTTP request with an Authorization: Basic ENCODED-STRING header containing an encoded string from the login and password provided by the user.
Generating the login and password for nginx http auth
The format of a .htpasswd file containing http basic auth credentials is as below:
MyUser:encodedpasswordstring
The actual contents can be developed using the htpasswd utility found in the apache2-utils package available in every Linux repository or by using OpenSSL, which doesn’t require installation.
Generating a .htpasswd file with htpasswd utility
$ sudo htpasswd -n MyUser
New password:
Re-type new password:
MyUser:FGH2K.l/5NRNE
The output shows how to generate the user: password string, but the utility can either update an existing .htpasswd file or create a new one. Below are more details:
$ sudo htpasswd user
Usage:
	htpasswd [-cmdpsD] passwordfile username
	htpasswd -b[cmdpsD] passwordfile username password

	htpasswd -n[mdps] username
	htpasswd -nb[mdps] username password
 -c  Create a new file.
 -n  Don't update file; display results on stdout.
 -m  Force MD5 encryption of the password.
 -d  Force CRYPT encryption of the password (default).
 -p  Do not encrypt the password (plaintext).
 -s  Force SHA encryption of the password.
 -b  Use the password from the command line rather than prompting for it.
 -D  Delete the specified user.
On Windows, NetWare and TPF systems the '-m' flag is used by default.
On all other systems, the '-p' flag will probably not work.
Generating a .htpasswd file with openssl/crypt function
For more examples, the nginx website provides more examples of generating encoded username: and password strings using OpenSSL at http://wiki.nginx.org/Faq.
$ sudo printf "MyUser:$(openssl passwd -crypt mypassword)\n"
Warning: truncating password to 8 characters
MyUser:iBOqXUAhHLHAA
Substitute “MyUser” with your desired username.
Either method you choose to generate the credentials needs to be pasted into an actual file on the disk. In this case, I will use /etc/nginx/.httpd.conf.
Putting it all together in the nginx configuration
Edit your nginx vhost configuration for the intended domain (/etc/nginx/conf.d/server1.conf) and add the following two lines:
        auth_basic "Please provide nginx http auth credentials";
        auth_basic_user_file /etc/nginx/.htpasswd;
Confirm contents of .htpasswd:
Depending on the nginx host configuration file or the “location” section where these lines are added, nginx http auth can be imposed on subdomains, virtual folders, or your website’s home page. Below is how to enforce http authentication for a virtual folder with nginx.
 server {
…
  location /protected_virtual_folder {
      root   /var/home/www/server1.domain.com;
      index  index.html index.htm;
      auth_basic "Please provide nginx http auth credentials";
      auth_basic_user_file /etc/nginx/.htpasswd;
  }
…
}
The auth_basic line instructs the engine to enforce http authentication for that specific uri location and sets the message prompted to the user and auth_basic_user_file sets the authentication file path.
Confirm the htpasswd file contains the username and the encoded password.
$ sudo cat /etc/nginx/.htpasswd
MyUser:Y07rRo0U6qtDI
Reload nginx configuration
$ sudo /etc/init.d/nginx reload
 * Reloading nginx configuration nginx                                   [ OK ]
Let’s test by loading the https://server1.domain.com/protected_virtual_folder/ in our browser and see the outcome: