In this tutorial will show you how to deploy an All-In-One
Ubiquiti Management Suite Server
on VPSie using the one click provisioning option. The hosted Ubiquiti applications include mFi Controller for environmental automation, UniFi Controller for centralized management of Wireless & other network devices, and Air Control 2 to mange most legacy and AirMAX network devices.
Note: This platform is free to use and doesn’t need subscription.
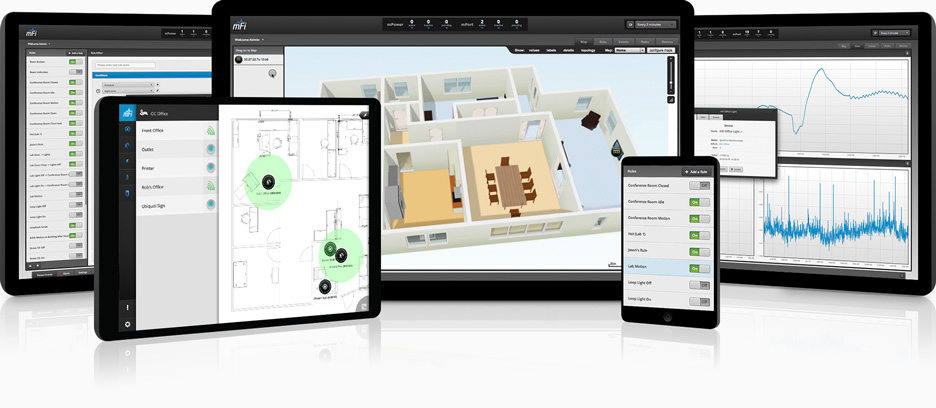
mFi – hardware and software combines plug-and-play installation with big-data analytics, event reporting and scheduling to create powerful relationships between sensors, machines and power control.
Advanced Management Software – Make buildings smarter and more efficient using the intuitive UI and powerful features of the mFi®Controller software.
UniFi – is the revolutionary Wi-Fi system that combines Enterprise performance, unlimited scalability, a central management controller and disruptive pricing.
UniFi software provides an intuitive, easy-to-learn interface for installing, configuring and managing your Wi-Fi devices.

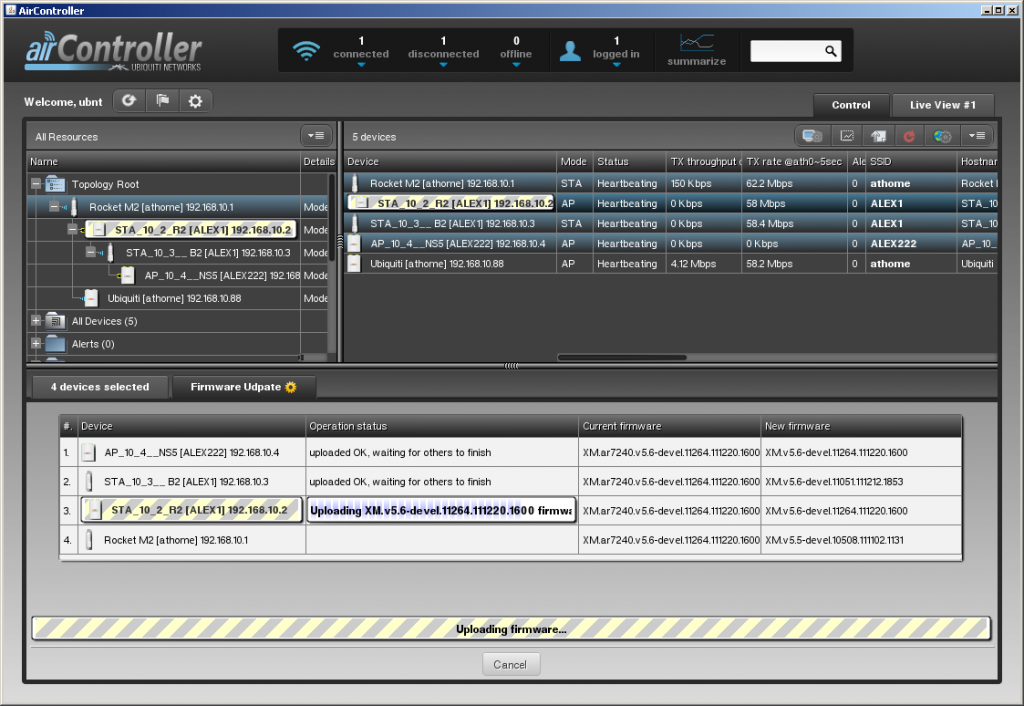
AirControl 2 is a powerful and intuitive web based server network management application which allows operators to centrally manage entire networks of Ubiquti devices.
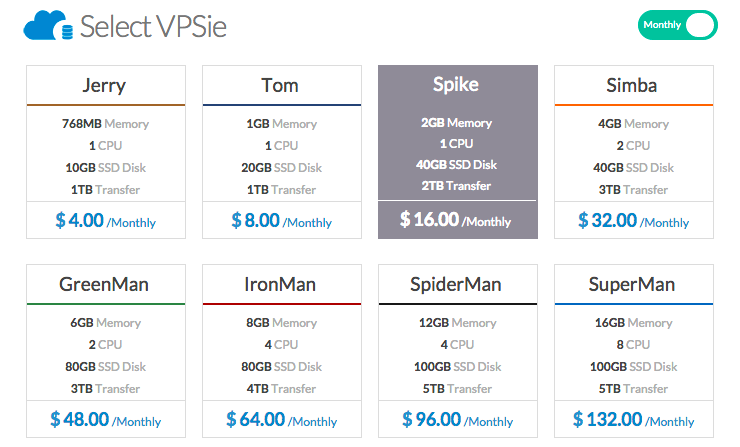
Please note; Since we have prepared this image with three powerful management apps on one server, we suggest that you take into account the system resources required for all of them to run successfully in production. If you plan on using all three on a single server instance, It’s required to have at least 2GB of Memory available with the SPIKE package at minimum or else services will intermittently fail to start.
1. Now that you have decided to provision these apps on VPSie, let’s get on with the fun… First you need to login to your VPSie account and head over to the first tab called VPSie.
2. On the bottom of the page, click the – Add New VPSie button.
3. On the next screen select SPIKE package or above.
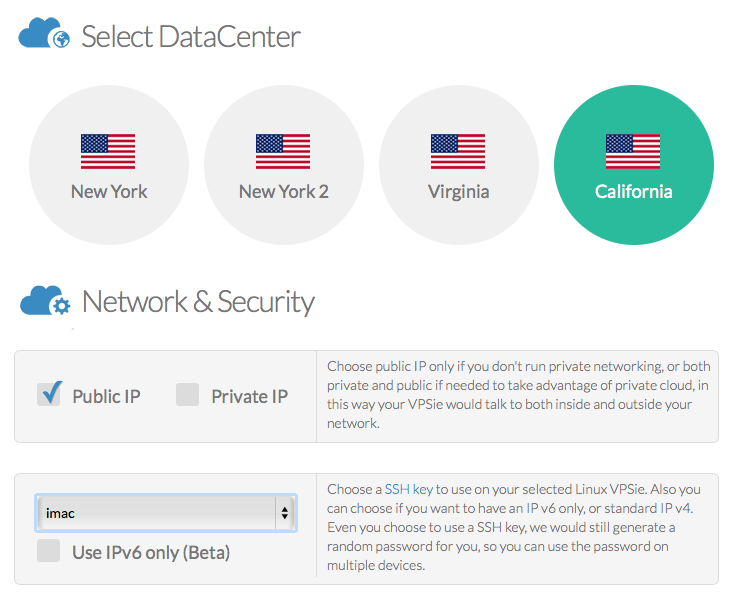
4. For the sake of simplicity we will only select Public IP
5. Choose the ssh key we have previously added to our account (if you don’t select the ssh key you will have to wait for the e-mail after the VPSie is created to get your password).
6. Select the DataCenter where you want your the template deployed.
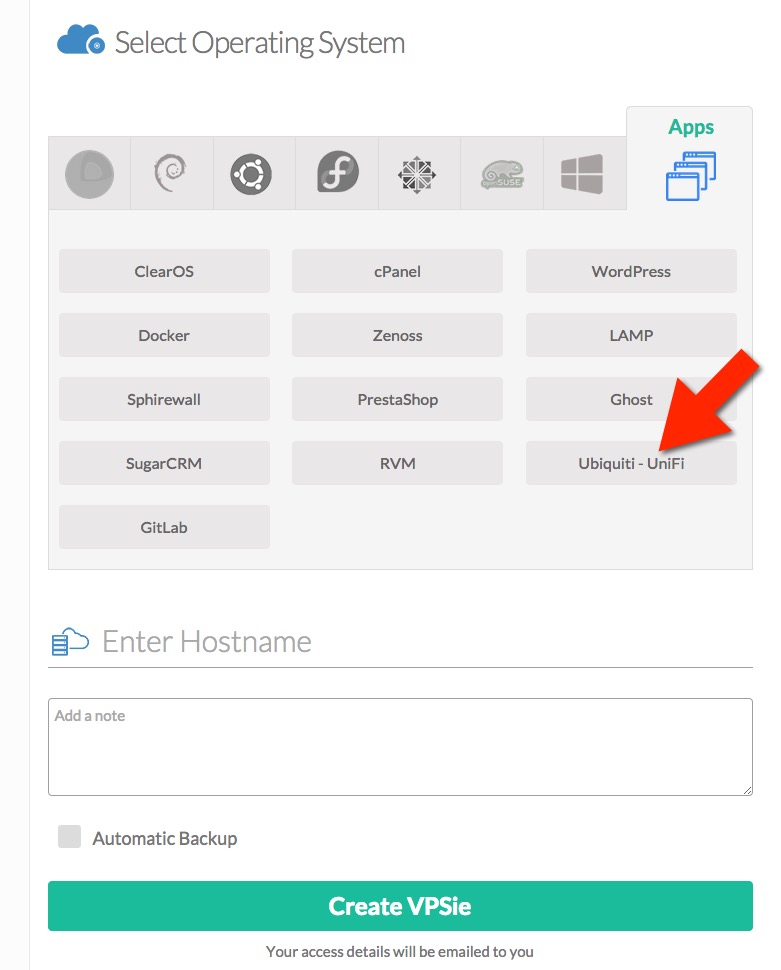
7. Next you click on the Apps tab and select Ubiquiti from the application lists then type your hostname and click on Create VPSie button on the bottom.
Once the VPSie is deployed, Please allow for up to 5 minutes for the applications to configure themselves and start.
Setup & Configure Air Control 2
The Air Control 2 Application can be accessed by a workstation based “Fat Client” only. The client software can be found on the following Ubiquiti Community page;
https://community.ubnt.com/t5/airControl/AirControl-Latest-Release-Download/m-p/155834#U155834
Here are the Client installer direct links;
Windows Installer – http://community.ubnt.com/t5/airControl/AirControl-Latest-Release-Download/m-p/155834#U155834
Debian Installer – https://www.ubnt.com/downloads/aircontrol/aircontrol_1.4.2-beta_all.deb
Generic Tarball – https://www.ubnt.com/downloads/aircontrol/aircontrol-1.4.2-beta.tar.gz
If installers don’t reflect latest version, you will be prompted for update on first start-up after fresh install (as long as the server has internet access).
If you are on the same computer you installed the service on, please open your web browser and type in localhost:9080 if you set up on defaults settings.
Please report any bugs or suggestions you may have through this forum.
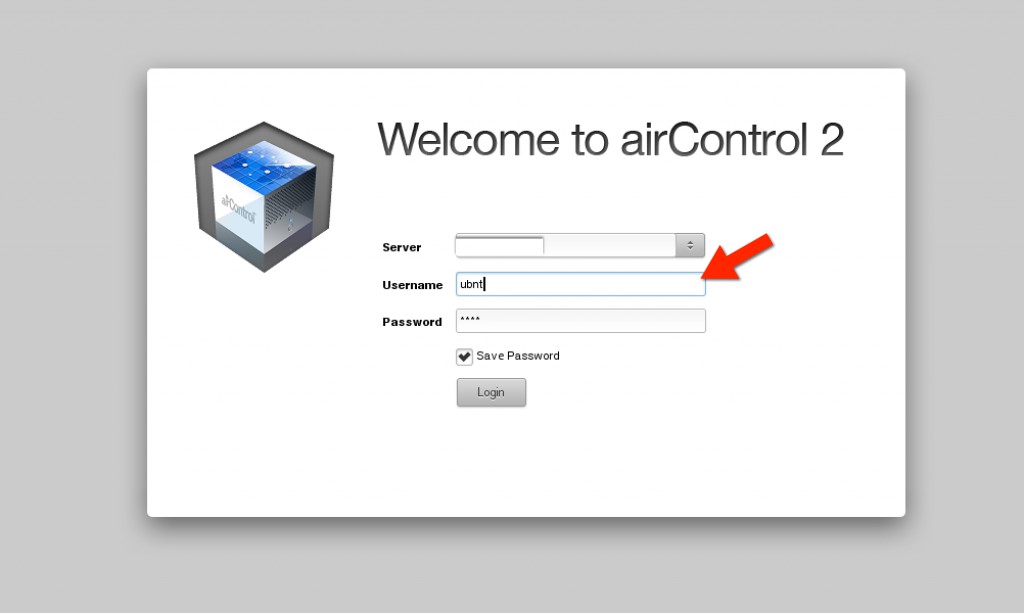
* The default credentials are:
Username: ubnt
Password: ubnt
A good set of Client installation Instructions (including for Mac OsX) –
Here is the Ubiquiti AC2 Wiki – http://wiki.ubnt.com/AirControl2
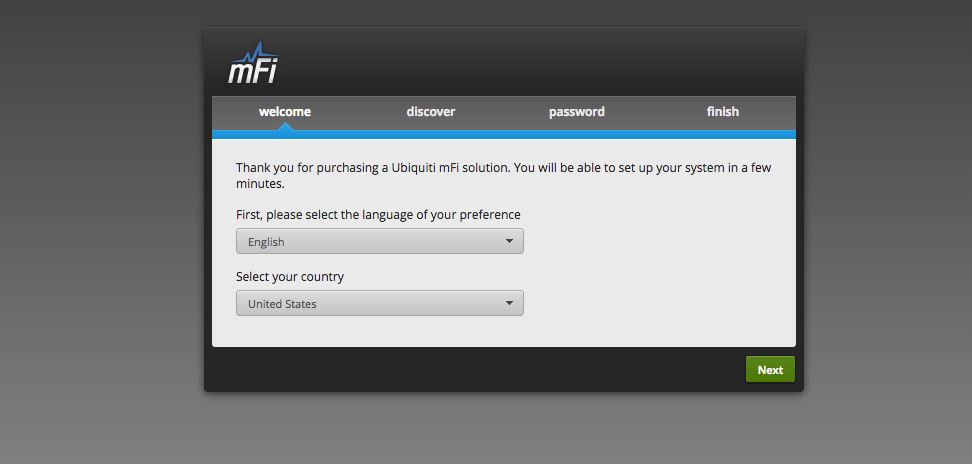
Setup & Configure mFi
Accessing the Ubiquiti mFi controller is as easy as it can be…
1. Once your VPSie system is running, please allow about 5 minutes after system start before attempting to connect.
2. Open your browser of choice, then enter the following URL while replacing the word {IP_ADDRESS} with your system’s actual IP address;
https://{IP_ADDRESS}:6443
3. Proceed with the configuration wizard and setup your desired settings and credentials.
Here is the Ubiquiti mFi community page – http://community.ubnt.com/t5/mFi/bd-p/mFi
Ubiquiti mFi User Guide – http://dl.ubnt.com/guides/mfi/MFi_User_Guide_V11.pdf
Setup & Configure UniFi
Accessing the Ubiquiti mFi controller is also very easy…
1. Once your VPSie system is running, please allow about 5 minutes after system start before attempting to connect.
2. Open your browser of choice, then enter the following URL while replacing the word {IP_ADDRESS} with your system’s actual IP address;
https://{IP_ADDRESS}:8443
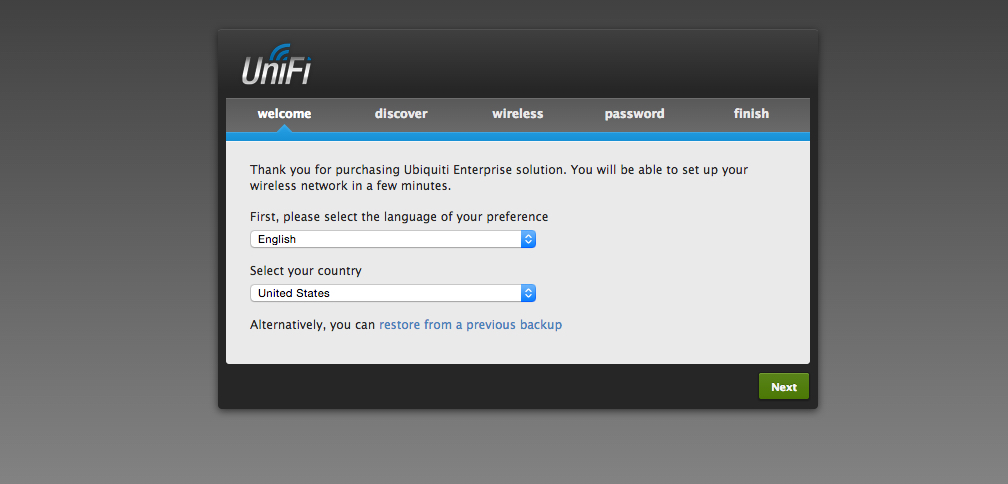 3. Proceed with the configuration wizard and setup your desired settings and credentials.
Here is the Ubiquiti UniFi community page – http://community.ubnt.com/t5/UniFi-Wireless/bd-p/UniFi
Ubiquiti UniFi User Guide – http://wiki.ubnt.com/UniFi_User_Guides
That’s it folks…. Your All-In-One Ubiquiti Management Suite is now hosted safe, secure on a high performance VPSie.
Now, if you would like to manage all of your sites with this hosted server, there are many ways to bridge your networks with a Virtual Private Network / Cloud on VPSie….
Not sure how? Just ask and we’ll guide you all the way! – If you need additional help, feel free to contact us directly as we will be happy to assist.
Enjoy…
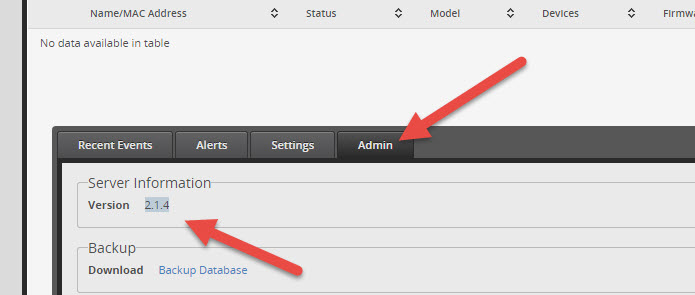
ADDED 05/05/2015 – Upgrading the Ubiquiti Unified platform on VPSie
Out of the box version is 2.1.4
 Using your favorite SSH Shell connector utility, connect via SSH to your VPSie system hosting the Ubiquiti Unified Platform using your IP address, user ID, and password to connect.
- Take a FULL BACKUP of your VPSie before you proceed! – VERY Important in case something goes wrong and you need to revert back.
Run the following commands…
- # apt-get update
- # apt-get upgrade
- # reboot

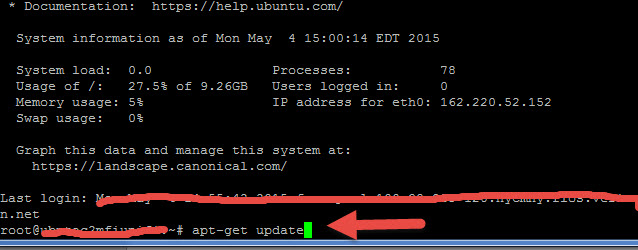
Please wait about 10 minutes after upgrade and reboot for the applications to settle before logging back in
Current version as of this document is 2.1.11

Update as of 09/11/2016
UniFi Controller APT howto
Add /etc/apt/sources.list.d/100-ubnt.list (or edit /etc/apt/sources.list). The ‘stable’ source is floating. If you wish to stay with a certain release branch, please specify it in the source line (i.e. for UniFi v5 use the ‘unifi5’ source, etc).
## Debian/Ubuntu
# stable => unifi4
# deb http://www.ubnt.com/downloads/unifi/debian unifi4 ubiquiti
# deb http://www.ubnt.com/downloads/unifi/debian unifi5 ubiquiti

deb http://www.ubnt.com/downloads/unifi/debian stable ubiquiti

# oldstable => unifi3
# deb http://www.ubnt.com/downloads/unifi/debian unifi3 ubiquiti
# deb http://www.ubnt.com/downloads/unifi/debian oldstable ubiquiti
Add the GPG Keys:
# for Ubiquiti
sudo apt-key adv --keyserver keyserver.ubuntu.com --recv C0A52C50

# or over HTTP by using hkp://keyserver.ubuntu.com:80
Update, install, and upgrade:
# retrieve the latest package information
sudo apt-get update

# install/upgrade unifi-controller
sudo apt-get install unifi
- (Optional) This step may not be required, depending on the Linux distro you have. If your distro does not come with MongoDB, and it’s not available in their repo, then please see the MongoDB installation guide. You can find the latest installation guide for Ubuntu HERE, and DebianHERE. Mongo 3 may not work reliably with the backup function of UniFi, so keep this in mind when updating Mongo. Mongo 2 is preferred at this time.
Notes:
- Ubiquiti do not allow direct listing/access of our repo. You will receive a 403 forbidden notice if you try to access the folder directly.
- If you need assistance with updates, configuration or installation – feel free to open a support ticket or utilize our low fee on-demand support services.