Search
Close this search box.

Server Login PuTTY Easy

Table of Contents

Easy and simple Server servers Login PuTTY Easy


Install the free application PuTTY and run it. Ensure the latest version of PuTTY is installed to ensure a successful connection to your server or VPS using SSH. It is well known that older versions have issues with connecting.


Download PuTTY


Use the PuTTY SSH Application to manage your servers using SSH

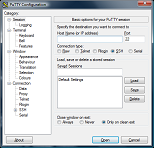
Open PuTTY and enter your Hostname/Website name or an IP Address in the Hostname box or IP Address field. The default port will be 22.
Click on the Open button to open the command line window (SSH)


In the command line window, type in the SSH username (usually: root) at the login prompt, click open on the PuTTY Application, or press enters on your keyboard.

Username: root

root password: your VPSie server password

If not, username root after logging in using this command:

su

Are you wondering How to log in as root? You must use the following commands to log in as a superuser/root user on any Linux machine: su command – Run a command with substitute user and group ID in Linux.


Sudo command – Execute a command as another user on Linux. Just type: su (typing su means super user; after typing su, you will usually be asked for a password unless you are logged in as root, aka su.


What is the root SSH password for my VPS?
Your VPSie server root password would be the same password you use to log in to your VPSie server; this would have been sent to you in the initial welcome email.

PuttyGen

PuTTY is a free and open-source terminal emulator, serial sympathize with, and network file transfer application. Moreover, it supports various network protocols such as SSH, Telnet, and login and can connect to remote servers and devices.

To use PuTTY to log in to a server, you need to have the server’s IP address or hostname and the username and password for the account you want to use. Once you have this information, you can open PuTTY and enter the server’s IP address or hostname in the “Host Name” field. Additionally, ensure the “SSH” protocol is selected, and the port number is set to 22 (or the port number used by your server). Finally, click “Open” to establish a connection, and you will be prompted for your username and password.

Creating a session can save your PuTTY login details for future use. First, enter the server’s IP address or hostname, set any necessary configuration options, and click the “Save” button. Next, you can give the session a name and click “Save” again to save the session. In the future, you can use the session by simply selecting it from the list of saved sessions and clicking “Load.”

To configure PuTTY for key-based authentication, generate a public/private key pair and upload the public key to the server. First, use the PuTTYgen tool to generate a key pair and then the Pageant tool to manage the keys. After that, you can upload the public key to the server by copying it to its authorized_keys file. Finally, configure PuTTY to use the private key for authentication by selecting the private key file in the “SSH/Auth” settings.

PuTTY includes a file transfer client called PSCP that can transfer files between your local machine and a server. To use PSCP, open a PuTTY session to the server, and enter the command “pscp” followed by the source and destination file paths. For example, to upload a file from your local machine to the server, you can run the command “pscp /path/to/local/file user@server:/path/to/remote/file.” To download a file from the server to your local machine, you can run the command “pscp user@server:/path/to/remote/file /path/to/local/file.”

PuTTY includes SSH tunneling that allows you to forward traffic from a local port to a remote port through an SSH connection. To use SSH tunneling, open a PuTTY session to the server and go to the “SSH/Tunnels” settings. Next, enter the local and remote port numbers, and select the “Local” option. Then, click “Add” to add the tunnel to the list. Finally, you can connect to the server, and any traffic sent to the local port will be forwarded to the remote port on the server. This can be useful for accessing services only available on the server’s network.

Make a Comment
Share on
Facebook
Twitter
LinkedIn
Print
VPSie Cloud service

Fast and Secure Cloud VPS Service

Try FREE
For a month

The First 1 orders gets free discount today! Try Sign up on VPSie to get a chance to get the discount.