Why SSH Key Authentication
SSH Key authentication is a more secure alternative to password authentication in Linux/Unix SSH servers. Password authentication is vulnerable to brute force cracking attacks where an attacker will try several user/password combinations until he finds one that allows access to the system.
SSH Keys have several over passwords as they are less likely to lose than passwords to forget, and they are strings of characters longer than passwords, thus making them much more secure than password authentication.
SSH private key can be encrypted with a user’s known password, so it’s use is limited to the person knowing the decryption passphrase.
RSA or DSA SSH Keys? Or ECDSA?
The internet is full of debates over what ssh key type is more secure and faster when it comes to encryption, decryption, and signature marking/checking. Still, almost everyone agrees that RSA keys are safe. In contrast, ECDSA is supposed to provide smaller critical sizes at faster operations and a similar degree of security as RSA and DSA crypto algorithms.
This article focuses on RSA key type, but before continuing, make sure you read the part of man ssh-keygen if you are looking for FIPS compliance:
     -b bits
             Specifies the number of bits in the key to create.  For RSA keys, the minimum size is 768 bits and the default is 2048 bits.  Generally, 2048
             bits is considered sufficient.  DSA keys must be exactly 1024 bits as specified by FIPS 186-2.  For ECDSA keys, the -b flag determines the key
             length by selecting from one of three elliptic curve sizes: 256, 384 or 521 bits.  Attempting to use bit lengths other than these three values
             for ECDSA keys will fail.
Generate SSH Key Pair with SSH-KEYGEN
$ ssh-keygen -b 2048 -C "My first ssh key" -t rsa
Generating public/private rsa key pair.
Enter file in which to save the key (/home/Andrei/.ssh/id_rsa): /home/Andrei/.ssh/my_ssh_key
Enter passphrase (empty for no passphrase):
Enter same passphrase again:
Your identification has been saved in /home/Andrei/.ssh/my_ssh_key.
Your public key has been saved in /home/Andrei/.ssh/my_ssh_key.pub.
The key fingerprint is:
f0:61:d9:9a:7f:b6:c3:f0:d5:59:78:71:2e:81:db:04 My first ssh key
The key's randomart image is:
+--[ RSA 2048]----+
|            Eo   |
|         o  . o..|
|      . + .  + +o|
|       + +  . + +|
|        S      +o|
|         ..   ...|
|          .+o.   |
|           o+.   |
|            ..   |
+-----------------+
$ cat .ssh/my_ssh_key.pub
ssh-rsa AAAAB3NzaC1yc2EAAAADAQABAAABAQDA1SL7dsAc5Wxpp/9h0zuDwGeN5H0vb4JFZ+n2+Js/B8Egqzw5Xb3iwZzHiXCCp71UgVrrPoYBeqhqDACWqJjj57D7vEDiKVmdyAcw2DfAT09uLe6wWeoX+s11Tadap11fVSYyARd3ih7OdoW9Hq1t0FyNgLXFvff60A0XTIeoM/6Y9/l0a7KoN8F5dy3kGvV4iNfCUsNEu0jrOPILRV39Bw8GKTxM7GoHAdAk/n4dOl9u+KgEictyVE1AXigipK6RtTClFO5xgGJBathXr0irkFCXRA+0FX79wql588bkmm/vrltdnZqT1rlzxp0q2cdsbbwJz/UItm5Un2t2MV1n My first ssh key
The generation of the ssh keys is done. Few things to note here:
– Key length is set with the -b option.
– The Public Key will contain the chosen comment by the -C option.
– Type in RSA
Whether or not the private Key is encrypted and the passphrase protecting it is optional, but for higher security, it is recommended to set one and not forget it. The entered passphrase is not shown on the terminal. An encrypted private key ensures that a potential loss of the Key does not pose an immediate threat to the systems using that Key.
The destination directory of the keys is optional, but it is a good practice to generate them in a home directory under the .ssh directory.
Now that public and private keys are available, it is essential to know that the private key is personal and must only have a legally appointed administrator. The public ssh key will be used on the destination Linux VPS servers accepting the Private Key.
Deploy the Public SSH Key to destination systems.
The easiest way to accomplish this is to copy the contents of the public Key, login to the destination Linux/Unix system, and paste it into the authorized_keys under the .ssh directory by default. Once you have done so, save and exit the file.
SSH Key authentication should now work.
(Optional) SSH Key authentication – Final steps
Some SSH deployments will have Public key authentication disabled by default, so you need to make sure that the following options are set to “yes” in /etc/ssh/sshd_config (or equivalent SSH daemon configuration file):
RSAAuthentication yes
PubkeyAuthentication yes
Depending on whether or not password authentication is still desired, the following options should be set to “yes” or “no”:
PasswordAuthentication yesIf regular users should be allowed to log in via ssh using a password, but the root user should be disallowed to use it’s password, change the following line to:
PermitRootLogin without-passwordSave, exit, and restart/reload ssh, so the above changes take effect and login securely.
Deploy new Linux VPS servers with SSH Public key automatically
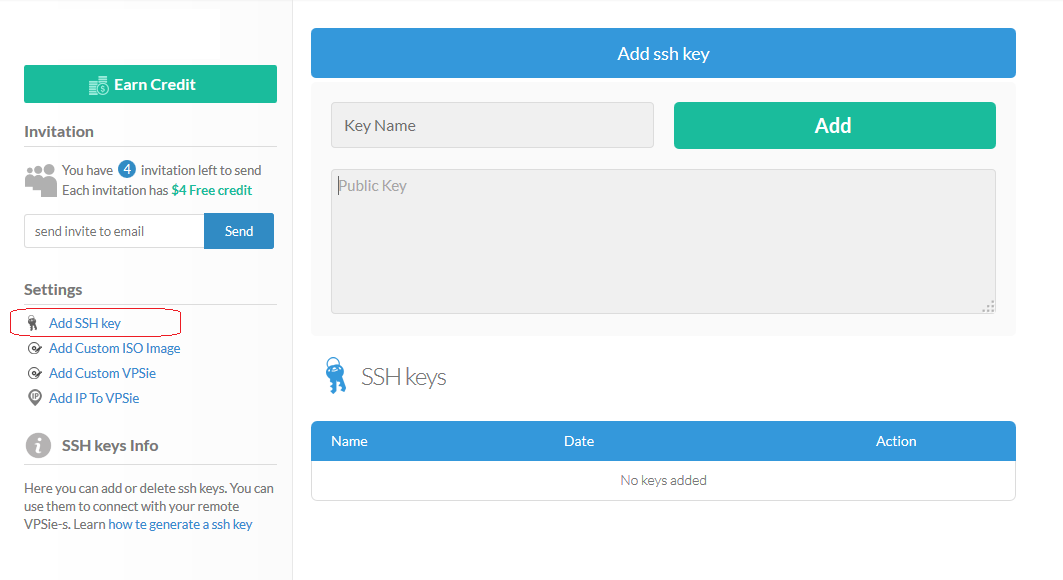
With VPSie, you can add the SSH Public key in the web administration tool, and new Linux-based VPS servers will have the Key added at creation time.
The image below provides a preview of this feature:
SSH Key Authentication is a method of logging into a remote server securely and without requiring a password. It involves using a public and private key pair to authenticate your login instead of a traditional password.
SSH Key Authentication is more secure than using a password because the private key used for authentication is never transmitted over the network. Instead, only the public key is sent to the server, which verifies the key against a list of authorized keys. Additionally, the private key is typically encrypted with a passphrase, making it even more difficult for an attacker to gain access to your server.
To generate an SSH key pair, you can use the ssh-keygen command. For example, to generate a new RSA key pair with a 4096-bit key size, you can run the command ssh-keygen -t rsa -b 4096.
To add your public key to your server, you can use the ssh-copy-id command. For example, if your username on the server is the user and the IP address of the server is 192.0.2.0, you can run the command ssh-copy-id [email protected]. This will copy your public key to the server and add it to the list of authorized keys.
To disable password authentication on your server, you can edit the sshd_config file and set the PasswordAuthentication option to no. For example, you can run the command sudo nano /etc/ssh/sshd_config and add the line PasswordAuthentication no to the file. Remember to restart the SSH service for the changes to take effect.
Yes, you can use the same SSH key pair on multiple servers. Simply copy your public key to each server using the ssh-copy-id command, and then use your private key to log into each server as needed.
If you lose your private key, you will need to propagate a new key pair and add the new public key to your server. Be sure to remove the old public key from the list of authorized keys to prevent unauthorized access to your server. Additionally, if you have encrypted your private key with a passphrase, be sure to choose a strong and unique passphrase for your new key pair.


