In the digital era, content management systems (CMS) play a pivotal role in creating and managing dynamic websites efficiently. Among the many of options available, Neos CMS stands out for its versatility, user-friendly interface, and robust features tailored for modern web development needs. If you’re a Debian 12 user looking to harness the power of Neos CMS for your website projects, you’re in the right place.
let’s dive into the fascinating world of Neos CMS installation on Debian 12 and unlock a world of possibilities for your projects.
First, let’s begin by creating your VPSie Account if you haven’t already done so, and then proceed to install the Debian 12 server as per your requirements.
To initiate the installation, please SSH into your system. Our first step is to advise updating your system prior to installing any software. To accomplish this, kindly execute the following commands:
sudo apt-get update -y
Install LAMP Server
VPSie provides LAMP server and numerous other marketplace servers. Upon setting up your account, you can execute the installation with just one click.
To set up your system, ensure you install Apache, MariaDB, PHP, and any other necessary packages. Execute the provided command to install them all:
apt-get install apache2 mariadb-server php libapache2-mod-php php-common php-mysql php-gmp php-curl php-intl php-mbstring php-xmlrpc php-gd php-bcmath php-xml php-cli php-gmagick php-zip curl unzip git -y
Edit the php.ini file and make some changes:
nano /etc/php/8.2/apache2/php.ini
Change the following lines:
short_open_tag = On
memory_limit = 256M
upload_max_filesize = 150M
max_execution_time = 360
date.timezone = UTC
Save and close the file, then restart the Apache service by following command:
systemctl restart apache2
Create a Database for Neos
To begin, you’ll want to establish a MariaDB root password and fortify the installation. This can be achieved through the following command:
mysql_secure_installation
Respond to each question in the following format:
Enter current password for root (enter for none):
Set root password? [Y/n]: Y
Remove anonymous users? [Y/n]: Y
Disallow root login remotely? [Y/n]: Y
Remove test database and access to it? [Y/n]:  Y
Reload privilege tables now? [Y/n]:  Y
After completing your task, access MariaDB by entering the following command:
mysql -u root -p
Generate a database and user for Neos CMS by executing the following command:
CREATE DATABASE neosdb;
CREATE USER 'neos'@'localhost' IDENTIFIED BY 'your-password';
GRANT ALL PRIVILEGES ON neosdb.* TO 'neos'@'localhost' IDENTIFIED BY 'your-password' WITH GRANT OPTION;
ALTER DATABASE neosdb charset=utf8mb4;
FLUSH PRIVILEGES;
EXIT;
Modify the MariaDB configuration file by implementing alterations:
nano /etc/mysql/mariadb.conf.d/50-server.cnf
Add the following lines:
innodb_file_format = Barracuda
innodb_large_prefix = 1
innodb_file_per_table = 1
innodb_default_row_format = dynamic
Save and close the file.
Finally, restart the MariaDB service to apply the changes:
systemctl restart mariadb
Install Neos CMS
Prior to beginning, ensure you have Composer installed on your system. Execute the following command to install Composer:
curl -sS https://getcomposer.org/installer | php
Transfer the Composer file to the system directory:
mv composer.phar /usr/local/bin/composer
Navigate to the Apache web root and fetch the Neos CMS by executing the specified command:
cd /var/www/html/
git clone https://github.com/neos/neos-base-distribution.git
Adjust the name of the downloaded directory, then execute the composer command to install all PHP dependencies:
mv neos-base-distribution neoscms
cd neoscms
composer install
Afterwards, ensure correct permissions and ownership are set for the Neos directory:
chown -R www-data:www-data /var/www/html/neoscms/
chmod -R 755 /var/www/html/neoscms/
Create Virtualhost for Neos CMS
Set up a virtual host configuration file for hosting Neos CMS, run the following command to create the config file:
nano /etc/apache2/sites-available/neoscms.conf
Add the following lines:
<VirtualHost *:80>
     ServerAdmin [email protected]
     DocumentRoot /var/www/html/neoscms/Web
     ServerName neos.example.com
     <Directory /var/www/html/neoscms/Web/>
          Options FollowSymlinks
          AllowOverride All
          Require all granted
     </Directory>
     ErrorLog ${APACHE_LOG_DIR}/neos_error.log
     CustomLog ${APACHE_LOG_DIR}/neos_access.log combined
     <Directory /var/www/html/neoscms/Web/>
            RewriteEngine on
            RewriteBase /
            RewriteCond %{REQUEST_FILENAME} !-f
            RewriteRule ^(.*) index.php [PT,L]
    </Directory>
</VirtualHost>
Save and close the file.
Activate the virtual host:
a2ensite neoscms.conf
Enable the Apache rewrite module:
a2enmod rewrite
Disable Apache default configuration file:
sudo a2dissite 000-default.conf
Restart the Apache web server:
systemctl restart apache2
Access Neos CMS Web Interface
Please open your web browser and navigate to http://your-domain.com if you have specified the domain in the virtual host configuration. Alternatively, you can directly enter your server’s IP address in the browser’s address bar.
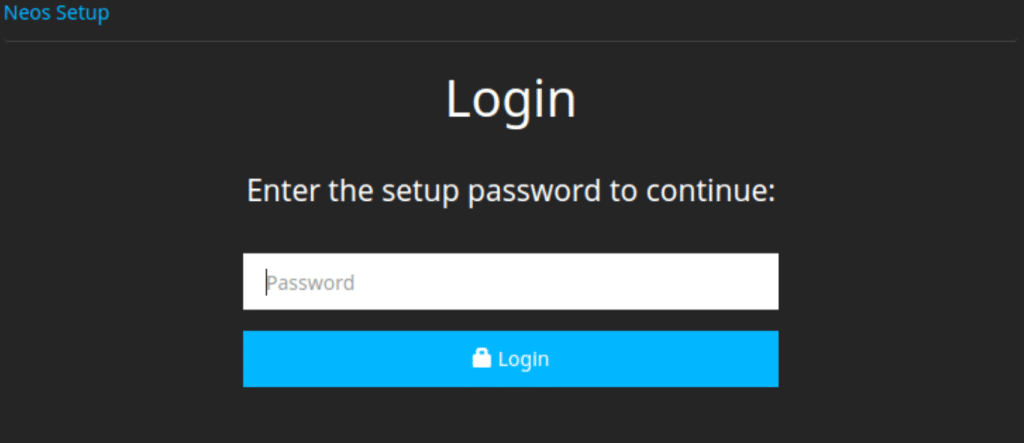
After reaching the Login page, input the setup password found in the file /var/www/neos/Data/SetupPassword.txt, then click on the Login button.
To verify the setup password, execute the following command:
cat /var/www/neos/Data/SetupPassword.txt
So, there you have it! With these simple steps, you can now install Neos CMS on your Debian system hassle-free. Get ready to dive into the world of content management with Neos and unleash your creativity!

