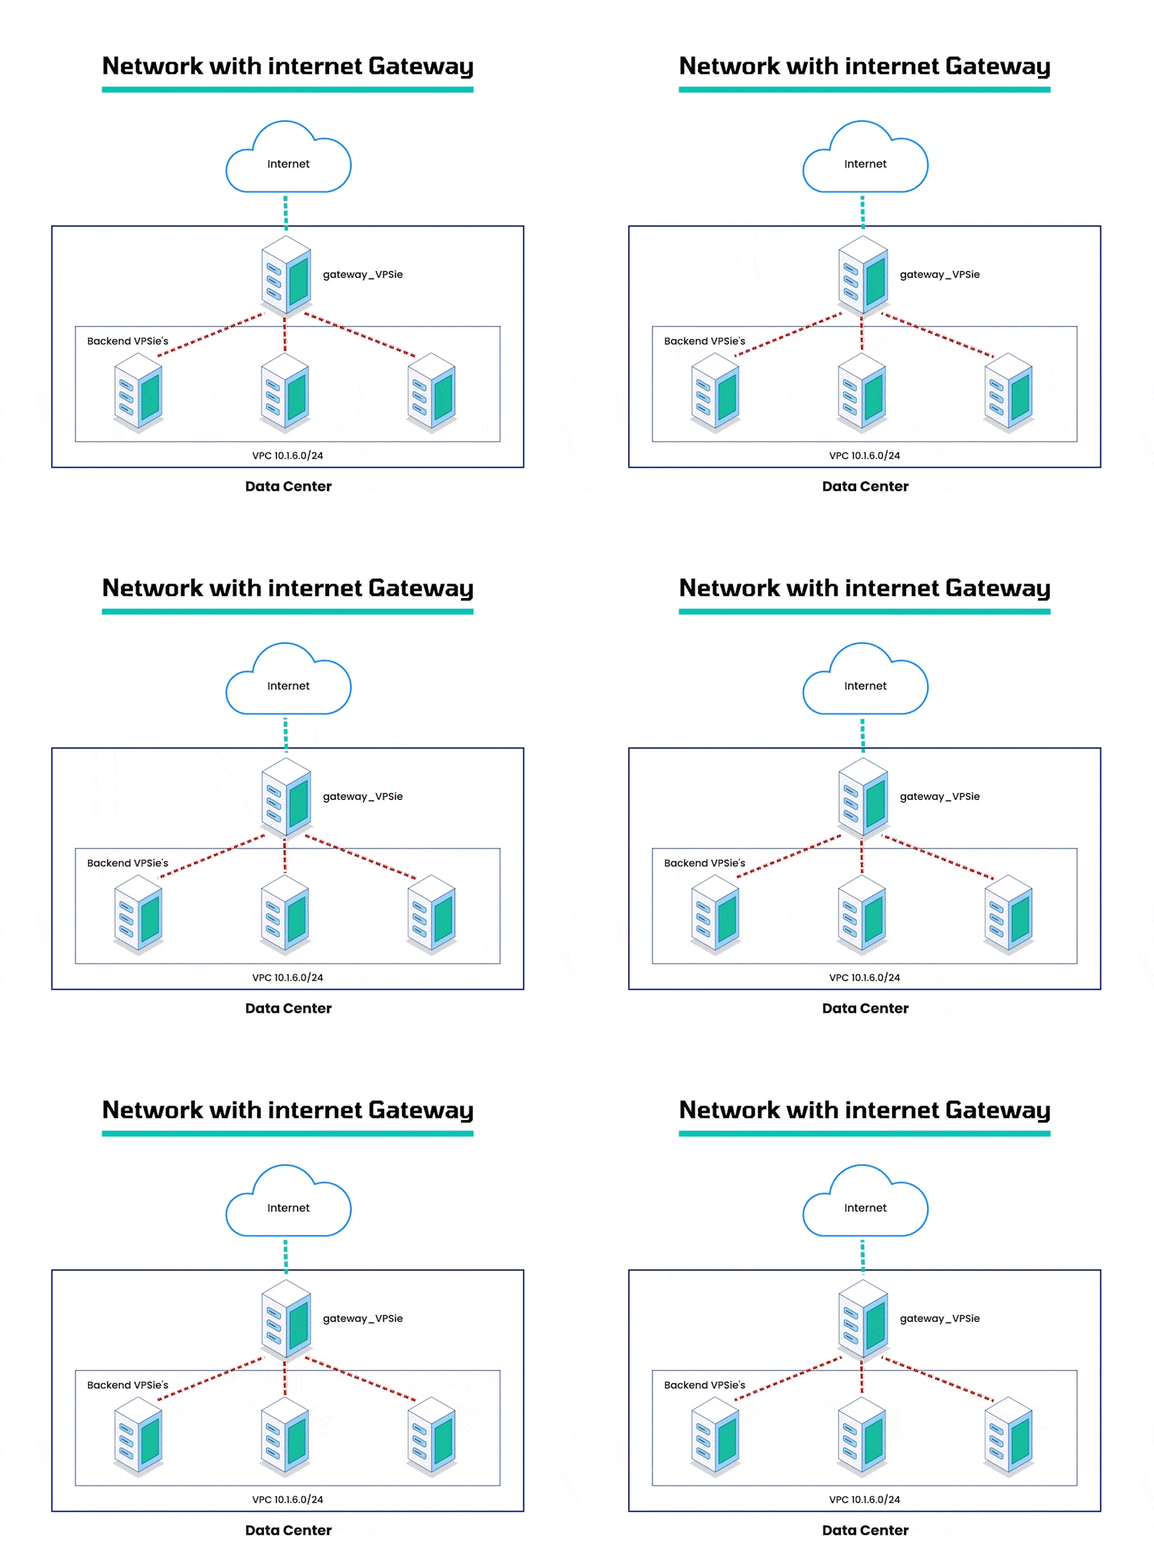
A Virtual Private Cloud (VPC) is a virtual network that is exclusively allocated to your VPSie account. It enables you to launch VPSie resources such as Virtual Machines (VMs) and storage service (S3) buckets, into a virtual network that you have defined. This allows you to segregate your resources from the public internet and provide increased security and control over your network infrastructure. A VPC gateway is an essential component of a VPC as it facilitates communication between your VPC and other networks. It acts as a router and firewall to regulate traffic between the VPC and other networks. This allows you to create a secure and secluded network environment for your resources while still allowing them to communicate with other networks as required.

By configuring VPSie Virtual Machines as internet gateways, you can establish a connection between your VPC network and the internet, allowing you to access your VPC resources from remote locations. These gateways act as a bridge between your VPC network and the public internet, while ensuring the security and isolation of your VPC network. This makes it an ideal solution for connecting on-premise networks or applications to your VPC, while maintaining the integrity and security of your VPC network.
This guide will walk you through the process of configuring a gateway and backend VM for Ubuntu on your VPSie account. By following the steps outlined in this guide, you will be able to create a secure and reliable connection between your VPC network and the internet.
So lets get started,
To configure your gateway, you need to set up its IP forwarding and NAT settings. This can be done by following these steps:
Step 1: Configure IP Forwarding
Log in to your Ubuntu gateway VPSie via SSH and run the following command to open sysctl.conf file.
sudo nano /etc/sysctl.conf
Uncomment the line net.ipv4.ip_forward=1 by removing the # symbol at the beginning of the line.
Save and close the file by pressing Ctrl + X, then Y, and then Enter
Run the command following to apply the changes :
sudo sysctl -p
Step 2: Configure NAT
Network address translation (NAT) allows your VPC network to communicate with the internet by converting the private IP addresses associated with the network’s traffic to the IP address of the internet gateway, and vice versa. This enables the gateway to correctly route traffic between your VPC network and other networks such as on-premise networks. In this way, NAT allows you to maintain the security and isolation of your VPC network while still allowing it to communicate with other networks. This is particularly useful for connecting to on-premise networks or applications while maintaining the integrity of your VPC network.
To configure your gateway’s NAT, install iptables:
sudo apt-get update
sudo apt-get install iptables
Run the following command to set up NAT on the gateway :
iptables -t nat -A POSTROUTING -s {vpc_prefix} -o {public_outgoing_interface_name} -j MASQUERADE
To find the public outgoing interface run the following command:
route -n | awk '$1 == "0.0.0.0" {print $8}'
To retrieve the VPC prefix from VPSie account:
Go to your VPSie account – Navigate to Resources, then Networking – finally VPC Network, Open the VPC you created. There you can find the VPC_prefix.
To persist these changes so that the NAT rule is automatically enabled when the Droplet boots up, you can install the iptables-persistent package. This package allows you to save your iptables configuration and have it automatically loaded on system boot.
sudo apt-get install iptables-persistent
After completing the installation process, iptables-persistent will prompt you to save the current IPv4 rules. To proceed, select Yes to save the current rules.
It is important that we need to save the current iptables configuration so that it will be automatically loaded on the next reboot.
Run the following command to do so:
sudo netfilter-persistent save
Configure Backend VPSie
ssh -o ProxyCommand="ssh -W %h:%p root@{public_IP_of_gateway_VPSie}" root@{private_IP_of_VPSie_Droplet}ip route change default via {private_IP_of_gateway_VPSie}route -n
sudo nano /etc/network/interfaces
gateway {private_IP_of_gateway_VPSie}You can run this command to verify which public IP you are getting to access the internet:
curl ifconfig.me
To configure your gateway, you need to set up its IP forwarding and NAT settings. This can be done by following these steps:
Step 1: Configure IP Forwarding
Log in to your Debian gateway VPSie via SSH and run the following command to open sysctl.conf file.
sudo nano /etc/sysctl.conf
Uncomment the line net.ipv4.ip_forward=1 by removing the # symbol at the beginning of the line.
Save and close the file by pressing Ctrl + X, then Y, and then Enter
Run the command following to apply the changes :
sudo sysctl -p
Step 2: Configure NAT
Network address translation (NAT) allows your VPC network to communicate with the internet by converting the private IP addresses associated with the network’s traffic to the IP address of the internet gateway, and vice versa. This enables the gateway to correctly route traffic between your VPC network and other networks such as on-premise networks. In this way, NAT allows you to maintain the security and isolation of your VPC network while still allowing it to communicate with other networks. This is particularly useful for connecting to on-premise networks or applications while maintaining the integrity of your VPC network.
To configure your gateway’s NAT, install iptables:
sudo apt-get update
sudo apt-get install iptables
Run the following command to set up NAT on the gateway :
iptables -t nat -A POSTROUTING -s {vpc_prefix} -o {public_outgoing_interface_name} -j MASQUERADE
To find the public outgoing interface run the following command:
route -n | awk '$1 == "0.0.0.0" {print $8}'
To retrieve the VPC prefix from VPSie account:
Go to your VPSie account – Navigate to Resources, then Networking – finally VPC Network, Open the VPC you created. There you can find the VPC_prefix.
To persist these changes so that the NAT rule is automatically enabled when the Droplet boots up, you can install the iptables-persistent package. This package allows you to save your iptables configuration and have it automatically loaded on system boot.
sudo apt-get install iptables-persistent
After completing the installation process, iptables-persistent will prompt you to save the current IPv4 rules. To proceed, select Yes to save the current rules.
It is important that we need to save the current iptables configuration so that it will be automatically loaded on the next reboot.
Run the following command to do so:
sudo netfilter-persistent save
Configure Backend VPSie
ssh -o ProxyCommand="ssh -W %h:%p root@{public_IP_of_gateway_VPSie}" root@{private_IP_of_VPSie_Droplet}ip route change default via {private_IP_of_gateway_VPSie}route -n
sudo nano /etc/network/interfaces
gateway {private_IP_of_gateway_VPSie}You can run this command to verify which public IP you are getting to access the internet:
curl ifconfig.me
To configure your gateway, you need to set up its IP forwarding and NAT settings. This can be done by following these steps:
Step 1: Configure IP Forwarding
Log in to your CentOS gateway VPSie via SSH and run the following command:
sysctl -w net.ipv4.ip_forward=1
Create the file /etc/sysctl.d/10-ip-forwarding.conf using a text editor, then add net.ipv4.ip_forward=1 and save to persist changes.
Step 2: Configure NAT
Network address translation (NAT) allows your VPC network to communicate with the internet by converting the private IP addresses associated with the network’s traffic to the IP address of the internet gateway, and vice versa. This enables the gateway to correctly route traffic between your VPC network and other networks such as on-premise networks. In this way, NAT allows you to maintain the security and isolation of your VPC network while still allowing it to communicate with other networks. This is particularly useful for connecting to on-premise networks or applications while maintaining the integrity of your VPC network.
To configure your gateway’s NAT, install iptables:
yum install iptables
Run the following command to set up NAT on the gateway :
iptables -t nat -A POSTROUTING -s {vpc_prefix} -o {gateway_outgoing_interface_name} -j MASQUERADE
To find the public outgoing interface run the following command:
route -n | awk '$1 == "0.0.0.0" {print $8}'
To retrieve the VPC prefix from VPSie account:
Go to your VPSie account – Navigate to Resources, then Networking – finally VPC Network, Open the VPC you created. There you can find the VPC_prefix.
To ensure that the NAT rule will be automatically activated upon booting up the Droplet, execute the following command:
iptables-save > /etc/sysconfig/iptables
Your new NAT configuration is saved.
To verify that the setup launches during startup, utilize the find command to display a list of services and files that initiate during startup.
find /etc -type f -atime -1
If /etc/sysconfig/iptables is in the list, the iptables configuration will run at startup
Configure Backend VPSie
ssh -o ProxyCommand="ssh -W %h:%p root@{public_IP_of_gateway_VPSie}" root@{private_IP_of_backend_VPSie}
route -n
Now add your new gateway VPSie’s IP route to the backend VPSie’s network configuration, check VPC interface and you gateway VPSie private ip:
route add default gw {private_IP_of_gateway_VPSie} {interface}Give the VPC interface name of your backend VPSie and edit the file using the following command:
nano /etc/sysconfig/network-scripts/ifcfg-<interface>
GATEWAY={private_IP_of_gateway_VPSie}
You can run this command to verify which public IP you are getting to access the internet:
ip route | grep default


