In this tutorial, we will explain to you How To Connect Windows Server 2012 R2 to NFS Shares.
Network File System (NFS) is a popular distributed filesystem protocol that enables users to mount remote directories on their server. The system lets you leverage storage space in a different location and write onto the same space from multiple servers in an effortless manner.
To install NFS Client feature, open Server Manager and click Add Roles and Features.
In Before You Begin section, skip it by clicking Next.
In Installation Type section, choose Role-based or feature-based installation and click Next.
Skip Server Selection section by clicking Next.
Also, skip the Select Roles section.
In Feature section, found Client for NFS and check it.
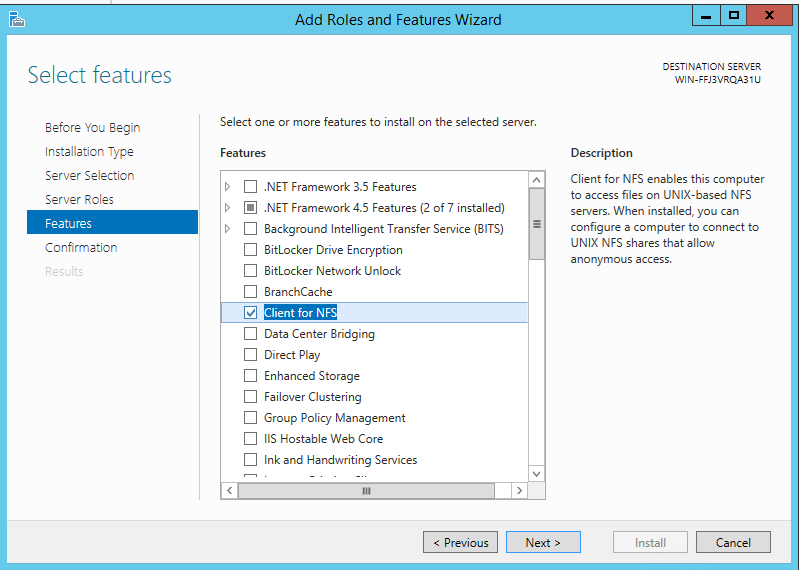
After checking, click Next.
In Confirmation section, skip it by clicking Install.
Wait for feature installation and click Close after installing.
Now it’s time to Mount NFS Share.
To mount NFS Share submit these commands on Command Prompt one by one:
mount -user:VPSie -p:MyPassword \\WINSRV01\exports\dept Z:
mount -user:VPSie -p:* \\WINSRV01\exports\dept Z:
mount -user:VPSie -p:* \\WINSRV01\exports\dept *
mount -o mtype=hard -user:VPSie -p:* \\WINSRV01\exports\dept *
Note: Change the user and password as your access details.
You have successfully connected Windows Server 2012 R2 to NFS Shares.
Enjoy